
In this guide, we delve into the art of how to program realistic drums, transforming your digital beats into lifelike rhythms. But we’re not just talking about any drum beats; we’re focusing on how to make them sound as real and lifelike as possible. You know, the kind that makes listeners tap their feet and think, “Is that a live drummer?”
Drum programming is a big deal in today’s music world. It’s everywhere – in pop songs, hip-hop tracks, electronic music, you name it. But there’s a trick to it. The goal is to make these programmed drums feel as natural and authentic as a real person playing them. And the truth is that it’s totally doable, and I’m here to guide you through it.
We’ll start by understanding what drum programming is all about. We’ll look at the tools you need and get familiar with the different parts of a drum kit. Then, we’ll jump into the exciting part: creating those beats! I’ll share some neat tips and tricks to add life to your drum tracks, making them sound like a pro drummer is right there in the studio with you.
Essential Tips for Realistic Drum Programming
Use the Right Sounds
The most important thing when it comes to making realistic drumbeats is using the right drum sounds. Generally, there are two types of drum sounds we can use to program a drum beat. Synth drums and Samples.
Synth Drums: While exploring how to program realistic drums, it’s important to understand the role of synth drums in achieving unique sound textures. These are created using synthesisers, either hardware or software-based. Synth drums allow for a high degree of customization in terms of sound design. You can craft unique drum sounds that might not be achievable with acoustic drums. Synth drums are often used in electronic music genres for their distinctive, non-acoustic sound.
Samples: Drum samples are recordings of acoustic drums that have been digitally sampled. These samples can range from individual drum hits to complex loops and patterns. They are widely used in various music genres to create realistic drum tracks, especially when access to a live drummer or acoustic drum kit is limited. Samples can vary in quality and character, from high-fidelity studio recordings to lo-fi, characterful sounds.
Each type has its own set of advantages. Synth drums provide more control over the sonic characteristics of each drum sound, allowing for more experimental and electronic textures. On the other hand, samples can offer the authenticity and complexity of real acoustic drums, which can be especially important in genres that demand a realistic drum sound.
To achieve the most realistic drumbeat, it’s better to use acoustic drum samples, but even if you use electric/synth drums, the following steps will help you make them sound less robotic and more realistic.
The Most Realistic Drum Kit VST
If you want to master how to program realistic drums, Addictive Drums by XLN Audio is an invaluable tool for you. Addictive Drums doesn’t only use real, recorded acoustic drum samples. They brought drum sampling to a whole new level!
I’m using Addictive Drums for more than 10 years now, and I guarantee you that even musicians can’t hear the difference. Many times I used it on albums and even my musician friends thought it was real recorded drums.
Well… in some way it IS real recorded drums. But the reason is sounds extremely realistic is because they don’t just use one sample for each instrument. Even if you play the same instrument (like a snare) with the same velocity, you can hear that each of the hits sound slightly different, so I assume they are using many different sounds for the same instrument on the same velocity.
On top of that, dynamics is not just about volume when it comes to real instruments. When you play a snare louder or quieter, the timbre of the sound will be completely different.
In other words, you can play a single snare sound louder or quieter, it won’t sound real. But they take this into consideration when they created Addictive Drums, so they recorded sound samples for all the different volumes!
Alternatives to Addictive Drums
Now, I understand that not everyone has access to this VST as it’s not very cheap. The cheapest version of AD is around $170.
In this case, if you use simple one-shot drum samples, you can still do a few things to make your drumbeat sound more realistic.
First of all, try to find the most realistic sounding samples. This is probably the most important step. And secondly, try to use more than one samples. For example, try to use a different sound for ghost notes (more about that later).
Start with the Basics
The journey of mastering how to program realistic drums begins with a solid understanding of the basic drumbeat. The foundation of all drumbeats is the kick and the snare. Many people say that “kick and snare and hihats”, but that’s a very very old-school approach, and the hihats actually don’t determine the drum groove (not even in old-school). In fact, many times there aren’t even any hihats in today’s modern songs. The foundation of any drumbeat is really the kick and the snare.
What type of beat you program is totally up to the genre and style of your music. Well, this article is not about how to consctruct certain beats, but if you really want to be an expert in rhythm, get my book The Rhythm Code.
You can also check out my other article in which I share how to create a Hip Hop drumbeat.
Develop a Groove
Extending the groove is another way of making your drumbeat sound more realistic. Once you have a basic beat, you can make it more sophisticated by extending the groove. This means that instead of looping a one-bar drum beat, you can make a two-bar, four-bar, or eight-bar groove.
A two-bar drumbeat sounds less repetitive, less robotic than a one-bar beat. A four-bar drumbeat sounds even less repetitive. Although, keep in mind that you still need to loop it at some point and the period of the groove shouldn’t be too long (longer than 8 bars). If you just keep make variations in the drumbeat, it wouldn’t sound like a groove, it will sound more like an improvisation.
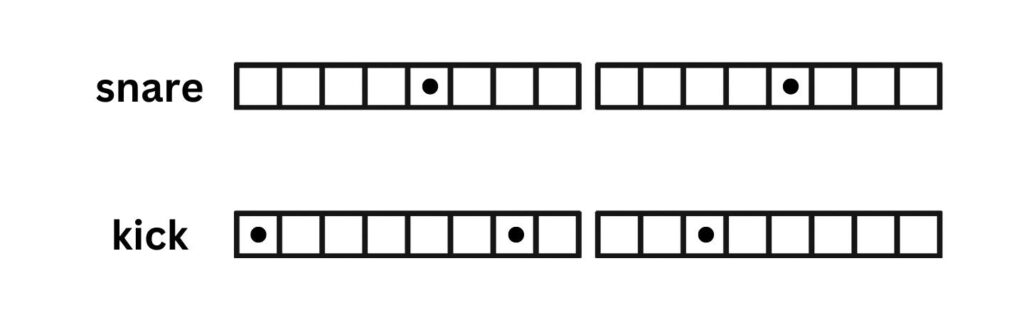
So how do you extend your one-bar loop into two or four bars? Well, we don’t have too much room to play with the snare drum because it plays the 2-4 beat in 99.99% of the time. But we can play with the kickdrum.
And sometimes you can make a varitation by adding only one extra note, and that already makes the one-bar loop into a two-bar loop. For example, here is a two-bar drumbeat:

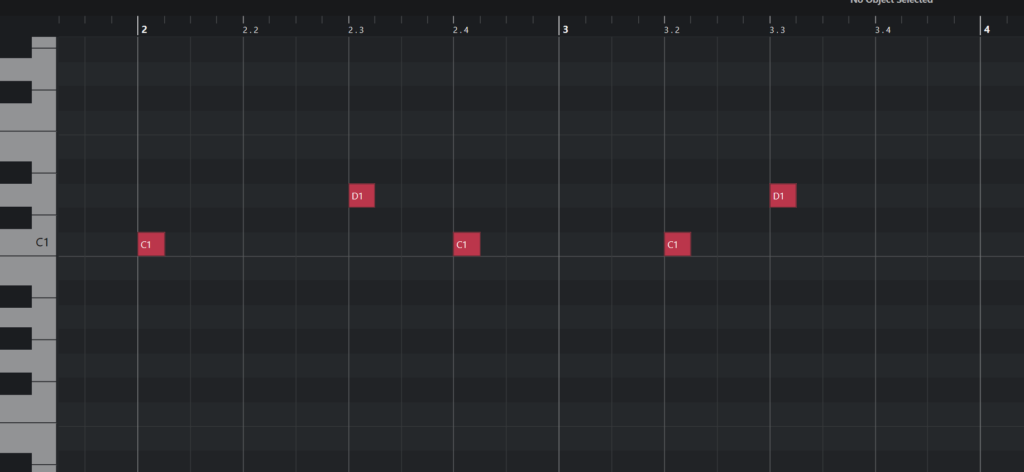
Now let’s add just one more note to the kick, but only in the fourth bar. This will make our two-bar groove into a four-bar groove:

Of course, this is just a very simple example, and you can make your drumbeat much more complex. This totally depends on your songs.
Use Ghost Notes
Now that you have a basic drum beat, and extended it into a four or even an eight-bar groove, there is even one more step you can do to make your programmed drumbeat sound more realistic. You can add ghost notes to your beat.
Ghost notes in a drumbeat are subtle, quieter notes that add nuance and complexity to the rhythm. They are usually played on the snare drum and are softer than the main beats, creating a background rhythmic texture. Ghost notes are crucial for adding feel and groove to drum patterns, making the rhythm more dynamic and expressive. They’re not meant to be the focal point of the beat but rather serve to enhance the overall sound and feel of the drumming.
While there are no specific rules to follow when it comes to ghost notes, I usually like to use upbeats in the snare. But you can add one or two quiet notes to the snare, and try to experiment with the placements of these notes.
If you are using Addictive Drums, and give lower velocity to those ghost notes, AD will automatically use different sounds for those quieter notes. But if you are using simple one-shot samples, you can just ad lower volume or even use a different snare sound for the ghost notes.
Use Micro-Rhythm
Understanding micro-rhythms is crucial when learning how to program realistic drums, as they add a human touch to your patterns.
Micro-rhythm is not about rhythmic patterns but more about how you can add flavor to your rhythm. It refers to the subtle rhythmic nuances that go beyond the basic notations found in standard music scores. If you are using a DAW, it means the notes are not necessarily precisely on the grid.
These are the tiny deviations and variations in rhythm that are too subtle to be accurately represented by conventional music notation, or in other words: the notes are not exactly on the grid. Micro-rhythms play a crucial role in adding expressiveness and a human touch to music, making it feel more alive and less robotic.
Micro-rhythms are particularly significant in genres where a high level of expressiveness and rhythmic flexibility is valued. For example, in many non-Western musical traditions, such as Brazilian, Cuban, and African rhythms, micro-rhythms are an integral part of the music and contribute to its unique feel and character. These nuanced rhythmic patterns often require immersion in the specific musical culture to be played correctly and are learned more effectively ‘by ear’ rather than through written notation.
The concept of micro-rhythms is also essential in contemporary music production, especially in genres that use electronic instruments and drum machines. In these contexts, micro-rhythms can be used to add a more natural and human feel to the music, counteracting the potentially rigid and mechanical feel of electronically generated rhythms.
Micro-rhythm is a huuuuge topic, I could write a whole book about it, but let’s see some examples.
Micro-rhythms can come intentionally, but it can also come naturally, or by “mistake”. For example, if you play a musical instrument, the more accurate you are, the more professional it will sound. But ironically, if you put all the notes on the grid, being 100% accurate, it will sound unrealistic… because no human can play with 100% accuracy.
In other words, if you are too floppy (inaccurate) in rhythm, it will sound bad, but if you program all the notes on the grid, it will sound unrealistic, unnatural.
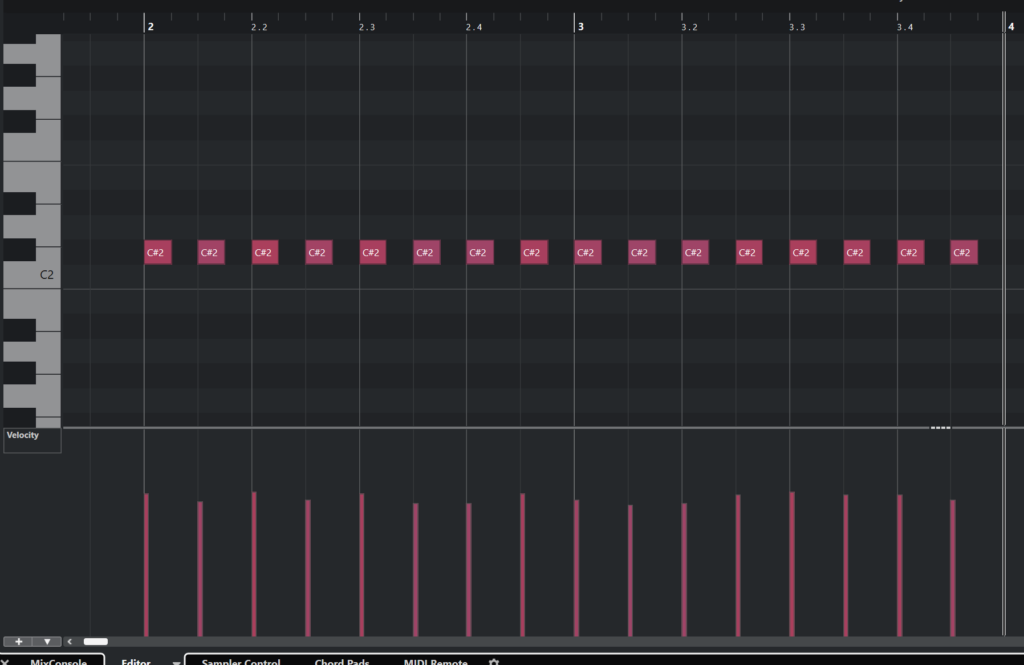
100% quantized, 100% on the grid:
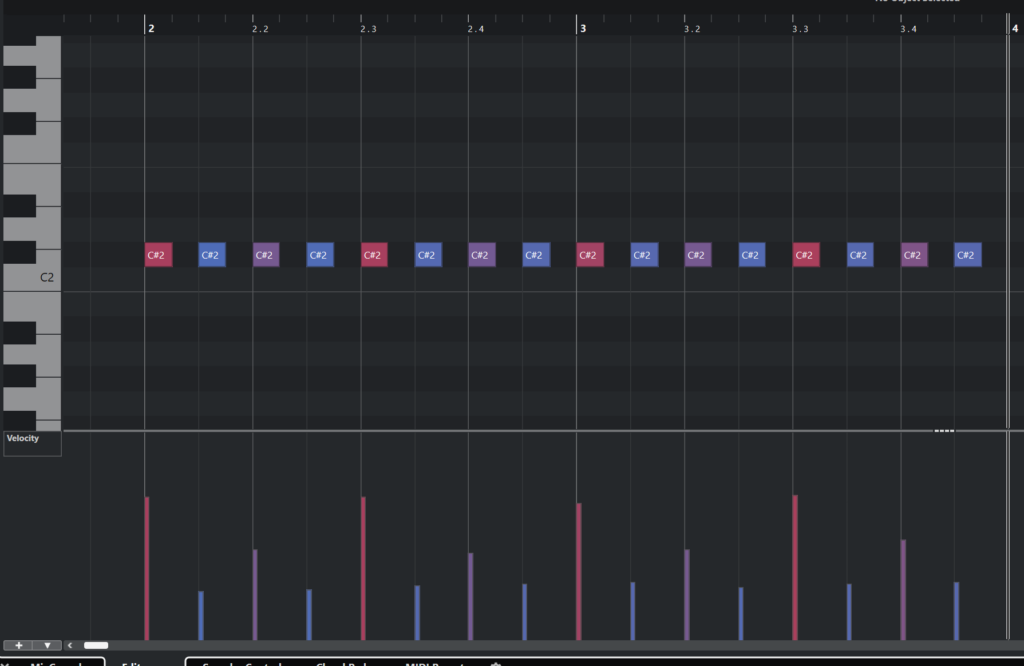
Not quantized:
So if you intentionally program these subtle “mistakes” in rhythm into your drum beat, it will make it sound more realistic. There are two ways you can add these tiny inaccuracies to the notes. If you record your drumbeat with a MIDI controller or MIDI keyboard, the notes will be naturally inaccurate, even if you are the best musician in the world.
If the rhythm is too inaccurate, you may want to quantize the MIDI notes, but if you want it to sound realistic, you shouldn’t do a 100% quantization on them!
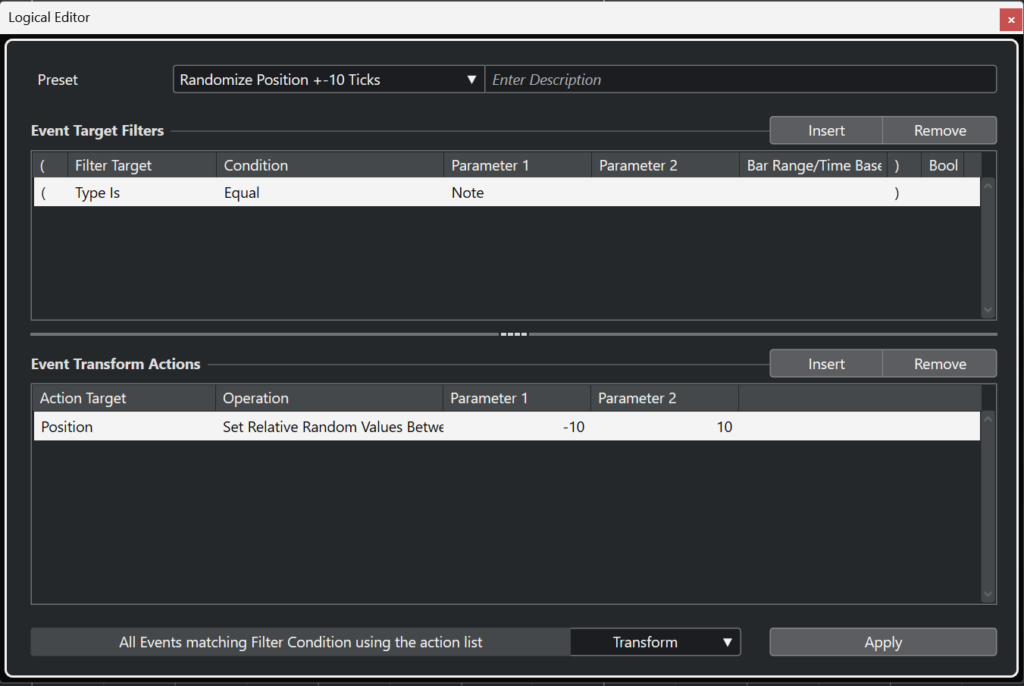
On the other hand, is you are programming the drums manually (putting down the notes one by one, using copy-paste, etc.), you want to out rhythmic inaccuraccies to the notes intentionally. You can do this with the notes one by one, but if you are using Cubase, there is an easy hack to this, you can randomize this rhythmic inaccuracy with the Logical Editor. (Probably other DAWs have this funcion too.)
Use Dynamics
We have discussed that no human being is able to play with 100% rhythmic accuracy. But this is also true to dynamics. Adding dynamics to your programmed drumbeat is another layer that gives life to the beat and makes it more realistic.
There are two types of dynamics within a drumbeat: intentional and unintentional volume differences. Unintentional volume differences in the notes come from the fact that we are not robots, so nobody can play all the notes with the same volume/velocity. Adding randomized tiny volume differences to the notes is another way of making them sound natural and real. There is also a tool for that in Cubase. (MIDI -> Functions -> Velocity -> Variance). If you don’t have this function in your DAW, you need to make random tiny differences in the volume/velocity of the notes.
Keep in mind that these volume differences shouldn’t be too big because it would just sound weird. These are tiny, subtle differences that can barely be heard, but all these tiny details give more life to the beat. See the velocity differences below, the differences are not that big.
Intentional dynamics is when a musician intentionally add different level of volume for certain notes. You can add the most dynamics to a hi-hat or a shaker, and it will immediately make it sound more realistic. I always use this pattern because this is almost exactly how a real drummer would play it.
So I add a hihat to my drumbeat, constant eighth notes, as you have seen it in the example above. The first note is the loudest, the third note is the second loudest, and the second and fourth notes are the quietest. If you program these velocities into your hihat, it will immediately become more alive, even if you are using electric/synth drums!
Add Fills
A real drummer is not a drum machine. This means that they don’t just play loops. What really differentiates a drum loop from a realistic drum tracks is the presence of FILLS.
What are drum fills?
Drum fills are short, often improvisational, sequences of drum beats that occur within a song. They are used to fill the gaps between musical phrases or sections, such as between a verse and a chorus. Drum fills serve various purposes in music, including:
- Signaling Transitions: Drum fills can signal shifts in the song’s structure, such as moving from the verse to the chorus or from the chorus to a bridge.
- Creating Mood: They can be used to create a specific mood or add a dynamic element to the music.
- Adding Variety: Drum fills add variety to the rhythm and keep the listener’s attention.
- Emphasizing Musical Phrases: A well-placed drum fill can emphasize the end of one phrase and the beginning of another, enhancing the overall musical narrative.
Drum fills can vary greatly in style and complexity, ranging from simple and straightforward to intricate and technically demanding.
You can find inspiration to create drum fills by listening to your favorite songs. You can just literally steal any drum fill from a song because it’s not the most unique part of a song to say the least. Or you can make a variation of that fill.
By the way, Addictive Drums (this is not a sponsored post, I just love this VST) includes drum fills, so this might be another reason to get it.
One thing you should keep in mind when it comes to drum fills: Don’t use the same drum fill pattern more than once in a song. It will just sound too repetitive if you do that. The drum groove is repetitive by nature, but don’t repeat a drum fill.
All these things are obviously take much more work than just copy-pasting a drum loop, but that’s exactly why these steps make your drumbeat sound more realistic.
Add Percussions
Now that you created an extended groove, added ghost notes, implemented micro rhythms, and dynamics, your drumbeat should sound much more realistic. But you can still add another layer of complexity to make it sound even more realistic: adding percussions.
Adding percussions to a programmed drumbeat can significantly enhance the realism of the sound for several reasons:
Variety and Complexity: Real drumming involves a wide range of percussive sounds, not just basic drum beats. By adding different percussion instruments like cymbals, shakers, tambourines, and congas, you can replicate the complexity and richness of a live drumming performance.
Layering and Depth: In a live setting, drums are not just about the beat; they create an acoustic environment with depth and spatial characteristics. Layering different percussive sounds can recreate this acoustic environment, giving the drum track a more three-dimensional and immersive quality.
Versatility in Sound Palette: Different percussion instruments bring their unique tonal qualities. This variety allows for a broader palette of sounds to be used in the rhythm track, enabling more creative and diverse drumming patterns.
You can use traditional percussion instruments like cowbells, congas, tambourine, but you can also use any type of organic sounds. For example, listen to this video how I made a beat from making noise with everyday items:
Mixing Drum Tracks
There are many different guidelines on how to mix a drum track, but since this article is about how to make it sound more realistic, we will approach this from this angle.
EQ
EQ-ing your drum tracks is about cutting out unwanted frequencies when it comes to making it sound more realistic.
Natural Resonance: Identify and subtly boost the natural resonant frequencies of each drum. This enhances the drum’s character without making it sound overly processed. Use a narrow Q (bandwidth) and sweep through the frequency spectrum to find these sweet spots.
Subtle Cuts for Realism: Instead of dramatic EQ boosts, focus more on cutting frequencies that sound unnatural or overly dominant. Small cuts can help drums sound more like they would in a natural acoustic setting. For example, slightly reducing some mid-range frequencies can help a snare or tom sound less boxy, more like it would in a room.
High-End Roll-Off: Real drums often don’t have an excessive high-end sheen that can come from digital samples or processing. Gently roll off the high frequencies, especially on cymbals and hi-hats, to soften them and avoid a harsh, digital sound.
Avoid Over-EQing: Realism often comes from what you don’t do. Avoid the temptation to over-EQ. Subtle adjustments are key. Drums in a natural setting are not overly sculpted in terms of frequency response.
Consistency Across the Kit: Ensure there’s a consistency across the drum kit. For instance, if you boost a certain low-end frequency on the kick, avoid boosting the same frequency on the toms or snare, as this can create an unnatural buildup.
Reference Acoustic Recordings: Compare your EQ’d drums with those in high-quality acoustic drum recordings. This can provide a benchmark for what realistic drums should sound like and help guide your EQ decisions.
Balance
Balancing the volume of the different percussive instruments is also a key to make a realistic sounding drumbeat. Here are a few guidelines to make your mix sound perfect:
Kick Drum: Typically, the kick drum is one of the foundational elements in a drum mix. Its volume should be set to provide a solid rhythmic base without overpowering other elements. In many genres, it’s common to start with the kick drum and balance other elements around it.
Snare Drum: The snare usually competes with the kick for prominence. Its volume should be balanced such that it cuts through the mix, especially on the backbeat in most genres. It shouldn’t be as loud as the kick but should be prominent enough to be heard clearly.
Hi-Hats and Cymbals: These should generally be lower in the mix compared to the kick and snare. They provide rhythmic texture and high-end frequency content but shouldn’t overpower the core drum elements.
Toms: In a typical drum kit, toms are used less frequently than the kick, snare, and hi-hats. Their volume should be balanced to be audible when played, but not so loud that they dominate when they are used.
Overheads (Cymbals, Hi-Hats, Room Tone): If your programmed drums include overhead or room mic simulations, these should be mixed to add spatial depth and a sense of airiness, without overwhelming the direct drum sounds. They add to the realism by providing a sense of the acoustic space.
Percussion Elements (Shakers, Tambourines, etc.): These should be mixed to add texture and rhythm without competing with the main drum elements. Their volume should be subtle enough to blend in but audible enough to contribute to the overall groove.
Panning
To create a realistic soundstage for your programmed drumbeat using panning, you should aim to mimic the spatial arrangement of a real drum kit as perceived by either the drummer or the audience. Here are specific panning guidelines for each element:
Kick Drum: The kick drum is typically centered in the stereo field. Since it’s a mono source in most drum kits, keeping it at the center helps anchor the rhythm.
Snare Drum:
In a real drum kit, the snare drum is typically positioned slightly off-center, depending on the drummer’s setup. While it’s a central element in terms of its role in the rhythm, its physical placement is usually slightly to one side.
For a right-handed drummer, the snare drum is positioned slightly to the left of center. When translating this to a mix for a realistic perspective, you could pan the snare slightly to the left (around 10-15% left). This mimics the perspective of an audience facing the drummer. For a drummer’s perspective mix, you’d pan it similarly to the left, since it’s to the drummer’s left side as well.
However, it’s worth noting that in many studio recordings and mixes, the snare drum is often panned dead center for a more balanced and focused sound. The choice to pan it slightly off-center for realism versus keeping it centered for a more traditional mix balance depends on the specific aesthetic and spatial goals of your mix.
Hi-Hats: Panning the hi-hats slightly to the left or right can mimic their position on a real drum kit. In a drummer’s perspective, this is often slightly to the left (around 10 to 30 percent to the left). For an audience perspective, it would be to the right.
Toms: Toms should be panned according to their physical placement on an actual drum kit. For a standard five-piece kit:
- High Tom: Slightly to the left (around 15-30%).
- Mid Tom: A bit further left than the high tom (around 30-45%).
- Floor Tom: To the right, but not as extreme as the furthest cymbal (around 50-70%).
Overhead Cymbals (Crash, Ride, etc.): Panning should reflect their placement in a real set:
- Crash Cymbals: One crash can be panned slightly to the left and the other to the right, depending on their position in a real drum kit.
- Ride Cymbal: Panned to the side where it’s typically placed, often to the right for a drummer’s perspective (around 40-60%).
Room Mics/Overheads: These tracks are often best left with a wide stereo spread to give a sense of the acoustic space around the kit. If your drum software/plugin allows for overhead mic simulation, use this to create a natural stereo image.
Additional Percussion: Instruments like tambourines, shakers, or congas can be panned to create a sense of space and prevent them from clashing with central elements. The panning here can be more flexible, based on the context of the song and the mix.
Consistency and Symmetry: Ensure that the panning is consistent and symmetrical. For instance, if you pan one crash cymbal to the left, pan the other to the right to balance it out.
Avoid Extreme Panning: Except for special effects, avoid panning elements too far to the sides. This can create an unbalanced and unrealistic soundstage.
Test with Headphones and Speakers: Check your panning on both headphones and speakers. Headphones can exaggerate the stereo effect, so it’s important to ensure it sounds natural on both.
Effects
If your drum is too dry, it definitely makes it sound unrealistic since there is always some level of reverb in a natural environment.
To use reverb and delay effectively for creating a more realistic sounding drum mix, it’s essential to consider how these effects can simulate the natural acoustic environment and the nuances of real drum playing. Here are specific guidelines:
Reverb on Snare and Toms:
- Snare: Apply a medium to short reverb to the snare to give it depth and space. Consider a room or plate reverb with a decay time around 1.2 to 1.8 seconds. Too much reverb can make the snare sound washed out, so balance is key.
- Toms: Similar to the snare, a bit of room reverb can help the toms feel more natural. A slightly longer decay than the snare can add to the drama, especially for floor toms.
Subtle Reverb on Kick Drum:
- Generally, the kick drum requires less reverb. A very subtle and short room reverb can add a bit of space without making the kick sound muddy. Decay times shorter than 1 second are usually sufficient.
Hi-Hats and Cymbals:
- Apply a light, high-end focused reverb to cymbals and hi-hats. This simulates the natural resonance and sustain of these metal elements. Be cautious with the amount; too much reverb can make them sound distant and washy.
Overhead/Room Mic Simulation:
- If your drum samples don’t include overhead or room mic tracks, you can simulate this by sending all your drum tracks to a reverb bus. Use a room or hall reverb with a decay that matches the size of a typical drum recording room. Blend this in subtly to create a sense of cohesive space around the kit.
Pre-Delay Settings:
- Adjust the pre-delay on your reverb to separate the direct sound of the drums from the onset of the reverb. This mimics the physical distance between the drums and the room boundaries. A pre-delay of 20-30 ms can add a sense of depth without blurring the initial drum hits.
Delay on Snare or Percussion:
- For a creative touch, a slapback delay (short delay with one or two repeats) on the snare or certain percussion elements can add a sense of space and depth. Keep the delay time short (around 75-150 ms) to avoid rhythmic dissonance.
EQ the Reverb:
- Apply EQ to the reverb sends or returns. Cut low frequencies (below ~100 Hz) to prevent muddiness, and gently roll off the very high end to avoid harshness. This makes the reverb sound more natural and integrated with the drums.
Control the Dynamics:
- Use a compressor after the reverb on your drum bus. This can help control the dynamics and sustain of the reverb, making it sound more like a natural part of the drum sound rather than an added effect.
Consistency Across the Kit:
- Ensure the reverb settings are consistent across the drum kit. A unified reverb treatment helps in creating a believable and cohesive acoustic space.
Listen and Adjust in Context:
- Always make final adjustments while listening to the drums within the full mix. The presence of other instruments can significantly affect how the reverb and delay are perceived.
Conclusion
I hope this guide helps you master how to program realistic drums and brings your digital compositions to life. As we’ve explored throughout this article, programming realistic drums is both an art and a science, blending creativity with technical precision. By applying the techniques we’ve discussed, you can transform your drum tracks from the mechanically ordinary to the dynamically extraordinary. Remember, practice and experimentation are your best allies in mastering this craft.
If you’re eager to dive deeper into the world of rhythm and refine your skills further, my book “The Rhythm Code” is an invaluable resource. It’s packed with insights, advanced techniques, and practical advice to take your drum programming to the next level. Grab your copy to unlock the secrets of captivating rhythms and grooves.
For those who seek a more personalized touch or professional assistance, I’m here to help. Whether it’s fine-tuning your current project or crafting unique beats from scratch, my music production services are tailored to meet your specific needs. Feel free to get in touch with me to discuss how we can bring your musical vision to life. Together, let’s create drum tracks that not only sound realistic but also resonate with your unique artistic signature.
The Secret Pattern Behind Successful Songs
Get the eBook for $7
